1
2
3
4
5
6
7
8
9
10
11
12
13
14
15
16
17
18
19
20
21
22
23
24
25
26
27
28
29
30
31
32
33
34
35
36
37
38
39
40
41
42
43
44
45
46
47
48
49
50
51
52
53
54
55
56
57
58
59
60
61
62
63
64
65
66
67
68
69
70
71
72
73
74
75
76
77
78
79
80
81
82
83
84
85
86
87
88
89
90
91
92
93
94
95
96
97
98
99
100
101
102
103
104
105
106
107
108
109
110
111
112
113
114
115
116
117
118
119
120
121
122
123
124
125
126
127
128
129
130
131
132
133
134
135
136
137
138
139
140
141
142
143
144
145
146
147
148
149
150
151
152
153
154
155
156
157
158
159
160
161
162
163
164
165
166
167
168
169
170
171
172
173
174
175
176
177
178
179
180
181
182
183
184
185
186
187
188
189
190
191
192
193
194
195
196
197
198
199
200
201
202
203
204
205
206
207
208
209
210
211
212
213
214
215
216
217
218
219
220
221
222
223
224
225
226
227
228
229
230
231
232
233
234
235
236
237
238
239
240
241
242
243
244
245
246
247
248
249
250
251
252
253
254
255
256
257
258
259
260
261
262
263
264
265
266
267
268
269
270
271
272
273
274
275
276
277
278
279
280
281
282
283
284
285
286
287
288
289
290
291
292
293
294
295
296
297
298
299
300
301
302
303
304
305
306
307
308
309
310
311
312
313
314
315
316
317
318
319
320
321
322
323
324
325
326
327
328
329
330
331
332
333
334
335
336
337
338
339
340
341
342
343
344
345
346
347
348
349
350
351
352
353
354
355
356
357
358
359
360
361
362
363
364
365
366
367
368
369
370
371
372
373
374
375
376
377
378
379
380
381
382
383
384
385
386
387
388
389
390
391
392
393
394
395
396
397
398
399
400
401
402
403
404
405
406
407
408
409
410
411
412
413
414
415
416
417
418
419
420
421
422
423
424
425
426
427
428
429
430
431
432
433
434
435
436
437
438
439
440
441
442
443
444
445
446
447
448
449
450
451
452
453
454
455
456
457
458
459
460
461
462
463
464
465
466
467
468
469
470
471
472
473
474
475
476
477
478
479
480
481
482
483
484
485
486
487
488
489
490
491
492
493
494
495
496
497
498
499
500
501
502
503
504
505
506
507
508
509
510
511
512
513
514
515
516
517
518
519
520
521
522
523
524
525
526
527
528
529
530
531
532
533
534
535
536
537
538
539
540
541
542
543
544
545
546
547
548
549
550
551
552
553
554
555
556
557
558
559
560
561
562
563
564
565
566
567
568
569
570
571
572
573
574
575
576
577
578
579
580
581
582
583
584
585
586
587
588
589
590
591
592
593
594
595
596
597
598
599
600
601
602
603
604
605
606
607
608
609
610
611
612
613
614
615
616
617
618
619
620
621
622
623
624
625
626
627
628
629
630
631
632
633
634
635
636
637
638
639
640
641
642
643
644
645
646
647
648
649
650
651
652
653
654
655
656
657
658
659
660
661
662
663
664
665
666
667
668
669
670
671
672
673
674
675
676
677
678
679
680
681
682
683
684
685
686
687
688
689
690
691
692
693
694
695
696
697
698
699
700
701
702
703
704
705
706
707
708
709
710
711
712
713
714
715
716
717
718
719
720
721
722
723
724
725
726
727
728
729
730
731
732
733
734
735
736
737
738
739
740
741
742
743
744
745
746
747
748
749
750
751
752
753
754
755
756
757
758
759
760
761
762
763
764
765
766
767
768
769
770
771
772
773
774
775
776
777
778
779
780
781
782
783
784
785
786
787
788
789
790
791
792
793
794
795
796
797
798
799
800
801
802
803
804
805
806
807
808
809
810
811
812
813
814
815
816
817
818
819
820
821
822
823
824
825
826
827
828
829
830
831
832
833
834
835
836
837
838
839
840
841
842
843
844
845
846
847
848
849
850
851
852
853
854
855
856
857
858
859
860
861
862
863
864
865
866
867
868
869
870
871
872
873
874
875
876
877
878
879
880
881
882
883
884
885
886
887
888
889
890
891
892
893
894
895
896
897
898
899
900
901
902
903
904
905
906
907
908
909
910
911
912
913
914
915
916
917
918
919
920
921
922
923
924
925
926
927
928
929
930
931
932
933
934
935
936
937
938
939
940
941
942
943
944
945
946
947
948
949
950
951
952
953
954
955
956
957
958
959
960
961
962
963
964
965
966
967
968
969
970
971
972
973
974
975
976
977
978
979
980
981
982
983
984
985
986
987
988
989
990
991
992
993
994
995
996
997
998
999
1000
1001
1002
1003
1004
1005
1006
1007
1008
1009
1010
1011
1012
1013
1014
1015
1016
1017
1018
1019
1020
1021
1022
1023
1024
1025
1026
1027
1028
1029
1030
1031
1032
1033
1034
1035
1036
1037
1038
1039
1040
1041
1042
1043
1044
1045
1046
1047
1048
1049
1050
1051
1052
1053
1054
1055
1056
1057
1058
1059
1060
1061
1062
1063
1064
1065
1066
1067
1068
1069
1070
1071
1072
1073
1074
1075
1076
1077
1078
1079
1080
1081
1082
1083
1084
1085
1086
1087
1088
1089
1090
1091
1092
1093
1094
1095
1096
1097
1098
1099
1100
1101
1102
1103
1104
1105
1106
1107
1108
1109
1110
1111
1112
1113
1114
1115
1116
1117
1118
1119
1120
1121
1122
1123
1124
1125
1126
1127
1128
1129
1130
1131
1132
1133
1134
1135
1136
1137
1138
1139
1140
1141
1142
1143
1144
1145
1146
1147
1148
1149
1150
1151
1152
1153
1154
1155
1156
1157
1158
1159
1160
1161
1162
1163
1164
1165
1166
1167
1168
1169
1170
1171
1172
1173
1174
1175
1176
1177
1178
1179
1180
1181
1182
1183
1184
1185
1186
1187
1188
1189
1190
1191
1192
1193
1194
1195
1196
1197
1198
1199
1200
1201
1202
1203
1204
1205
1206
1207
1208
1209
1210
1211
1212
1213
1214
1215
1216
1217
1218
1219
1220
1221
1222
1223
1224
1225
1226
1227
1228
1229
1230
1231
1232
1233
1234
1235
1236
1237
1238
1239
1240
1241
1242
1243
1244
1245
1246
1247
1248
1249
1250
1251
1252
1253
1254
1255
1256
1257
1258
1259
1260
1261
1262
1263
1264
1265
1266
1267
1268
1269
1270
1271
1272
1273
1274
1275
1276
1277
1278
1279
1280
1281
1282
1283
1284
1285
1286
1287
1288
1289
1290
1291
1292
1293
1294
1295
1296
1297
1298
1299
1300
1301
1302
1303
1304
1305
1306
1307
1308
1309
1310
1311
1312
1313
1314
1315
1316
1317
1318
1319
1320
1321
1322
1323
1324
1325
1326
1327
1328
1329
1330
1331
1332
1333
1334
1335
1336
1337
1338
1339
1340
1341
1342
1343
1344
1345
1346
1347
1348
1349
1350
1351
1352
1353
1354
1355
1356
1357
1358
1359
1360
1361
1362
1363
1364
1365
1366
1367
1368
1369
1370
1371
1372
1373
1374
1375
1376
1377
1378
1379
1380
1381
1382
1383
1384
1385
1386
1387
1388
1389
1390
1391
1392
1393
1394
1395
1396
1397
1398
1399
1400
1401
1402
1403
1404
1405
1406
1407
1408
1409
1410
1411
1412
1413
1414
1415
1416
1417
1418
1419
1420
1421
1422
1423
1424
1425
1426
1427
1428
1429
1430
1431
1432
1433
1434
1435
1436
1437
1438
1439
1440
1441
1442
1443
1444
1445
1446
1447
1448
1449
1450
1451
1452
1453
1454
1455
1456
1457
1458
1459
1460
1461
1462
1463
1464
1465
1466
1467
1468
1469
1470
1471
1472
1473
1474
1475
1476
1477
1478
1479
1480
1481
1482
1483
1484
1485
1486
1487
1488
1489
1490
1491
1492
1493
1494
1495
1496
1497
1498
1499
1500
1501
1502
1503
1504
1505
1506
1507
1508
1509
1510
1511
1512
1513
1514
1515
1516
1517
1518
1519
1520
1521
1522
1523
1524
1525
1526
1527
1528
1529
1530
1531
1532
1533
1534
1535
1536
1537
1538
1539
1540
1541
1542
1543
1544
1545
1546
1547
1548
1549
1550
1551
1552
1553
1554
1555
1556
1557
1558
1559
1560
1561
1562
1563
1564
1565
1566
1567
1568
1569
1570
1571
1572
1573
1574
1575
1576
1577
1578
1579
1580
1581
1582
1583
1584
1585
1586
1587
1588
1589
1590
1591
1592
1593
1594
1595
1596
1597
1598
1599
1600
1601
1602
1603
1604
1605
1606
1607
1608
1609
1610
1611
1612
1613
1614
1615
1616
1617
1618
1619
1620
1621
1622
1623
1624
1625
1626
1627
1628
1629
1630
1631
1632
1633
1634
1635
1636
1637
1638
1639
1640
1641
1642
1643
1644
1645
1646
1647
1648
1649
1650
1651
1652
1653
1654
1655
1656
1657
1658
1659
1660
1661
1662
1663
1664
1665
1666
1667
1668
1669
1670
1671
1672
1673
1674
1675
1676
1677
1678
1679
1680
1681
1682
1683
1684
1685
1686
1687
1688
1689
1690
1691
1692
1693
1694
1695
1696
1697
1698
1699
1700
1701
1702
1703
1704
1705
1706
1707
1708
1709
1710
1711
1712
1713
1714
1715
1716
1717
1718
1719
1720
1721
1722
1723
1724
1725
1726
1727
1728
1729
1730
1731
1732
1733
1734
1735
1736
1737
1738
1739
1740
1741
1742
1743
1744
1745
1746
1747
1748
1749
1750
1751
1752
1753
1754
1755
1756
1757
1758
1759
1760
1761
1762
1763
1764
1765
1766
1767
1768
1769
1770
1771
1772
1773
1774
1775
1776
1777
1778
1779
1780
1781
1782
1783
1784
1785
1786
1787
1788
1789
1790
1791
1792
1793
1794
1795
1796
1797
1798
1799
1800
1801
1802
1803
1804
1805
1806
1807
1808
1809
1810
1811
1812
1813
1814
1815
1816
1817
1818
1819
1820
1821
1822
1823
1824
1825
1826
1827
1828
1829
1830
1831
1832
1833
1834
1835
1836
1837
1838
1839
1840
1841
1842
1843
1844
1845
1846
1847
1848
1849
1850
1851
1852
1853
1854
1855
1856
1857
1858
1859
1860
1861
|
# Redis configuration file example.
#
# Note that in order to read the configuration file, Redis must be
# started with the file path as first argument:
#
# ./redis-server /path/to/redis.conf

# Note on units: when memory size is needed, it is possible to specify
# it in the usual form of 1k 5GB 4M and so forth:
#
# 1k => 1000 bytes
# 1kb => 1024 bytes
# 1m => 1000000 bytes
# 1mb => 1024*1024 bytes
# 1g => 1000000000 bytes
# 1gb => 1024*1024*1024 bytes
#
# units are case insensitive so 1GB 1Gb 1gB are all the same.

################################## INCLUDES ###################################

# Include one or more other config files here.  This is useful if you
# have a standard template that goes to all Redis servers but also need
# to customize a few per-server settings.  Include files can include
# other files, so use this wisely.
#
# Notice option "include" won't be rewritten by command "CONFIG REWRITE"
# from admin or Redis Sentinel. Since Redis always uses the last processed
# line as value of a configuration directive, you'd better put includes
# at the beginning of this file to avoid overwriting config change at runtime.
#
# If instead you are interested in using includes to override configuration
# options, it is better to use include as the last line.
#
# include /path/to/local.conf
# include /path/to/other.conf

################################## MODULES #####################################

# Load modules at startup. If the server is not able to load modules
# it will abort. It is possible to use multiple loadmodule directives.
#
# loadmodule /path/to/my_module.so
# loadmodule /path/to/other_module.so

################################## NETWORK #####################################

# By default, if no "bind" configuration directive is specified, Redis listens
# for connections from all the network interfaces available on the server.
# It is possible to listen to just one or multiple selected interfaces using
# the "bind" configuration directive, followed by one or more IP addresses.
#
# Examples:
#
# bind 192.168.1.100 10.0.0.1
# bind 127.0.0.1 ::1
#
# ~~~ WARNING ~~~ If the computer running Redis is directly exposed to the
# internet, binding to all the interfaces is dangerous and will expose the
# instance to everybody on the internet. So by default we uncomment the
# following bind directive, that will force Redis to listen only into
# the IPv4 loopback interface address (this means Redis will be able to
# accept connections only from clients running into the same computer it
# is running).
#
# IF YOU ARE SURE YOU WANT YOUR INSTANCE TO LISTEN TO ALL THE INTERFACES
# JUST COMMENT THE FOLLOWING LINE.
# ~~~~~~~~~~~~~~~~~~~~~~~~~~~~~~~~~~~~~~~~~~~~~~~~~~~~~~~~~~~~~~~~~~~~~~~~
#bind 127.0.0.1

# Protected mode is a layer of security protection, in order to avoid that
# Redis instances left open on the internet are accessed and exploited.
#
# When protected mode is on and if:
#
# 1) The server is not binding explicitly to a set of addresses using the
#    "bind" directive.
# 2) No password is configured.
#
# The server only accepts connections from clients connecting from the
# IPv4 and IPv6 loopback addresses 127.0.0.1 and ::1, and from Unix domain
# sockets.
#
# By default protected mode is enabled. You should disable it only if
# you are sure you want clients from other hosts to connect to Redis
# even if no authentication is configured, nor a specific set of interfaces
# are explicitly listed using the "bind" directive.
protected-mode yes

# Accept connections on the specified port, default is 6379 (IANA #815344).
# If port 0 is specified Redis will not listen on a TCP socket.
port 6379

# TCP listen() backlog.
#
# In high requests-per-second environments you need an high backlog in order
# to avoid slow clients connections issues. Note that the Linux kernel
# will silently truncate it to the value of /proc/sys/net/core/somaxconn so
# make sure to raise both the value of somaxconn and tcp_max_syn_backlog
# in order to get the desired effect.
tcp-backlog 511

# Unix socket.
#
# Specify the path for the Unix socket that will be used to listen for
# incoming connections. There is no default, so Redis will not listen
# on a unix socket when not specified.
#
# unixsocket /tmp/redis.sock
# unixsocketperm 700

# Close the connection after a client is idle for N seconds (0 to disable)
timeout 0

# TCP keepalive.
#
# If non-zero, use SO_KEEPALIVE to send TCP ACKs to clients in absence
# of communication. This is useful for two reasons:
#
# 1) Detect dead peers.
# 2) Take the connection alive from the point of view of network
#    equipment in the middle.
#
# On Linux, the specified value (in seconds) is the period used to send ACKs.
# Note that to close the connection the double of the time is needed.
# On other kernels the period depends on the kernel configuration.
#
# A reasonable value for this option is 300 seconds, which is the new
# Redis default starting with Redis 3.2.1.
tcp-keepalive 300

################################# TLS/SSL #####################################

# By default, TLS/SSL is disabled. To enable it, the "tls-port" configuration
# directive can be used to define TLS-listening ports. To enable TLS on the
# default port, use:
#
# port 0
# tls-port 6379

# Configure a X.509 certificate and private key to use for authenticating the
# server to connected clients, masters or cluster peers.  These files should be
# PEM formatted.
#
# tls-cert-file redis.crt
# tls-key-file redis.key

# Configure a DH parameters file to enable Diffie-Hellman (DH) key exchange:
#
# tls-dh-params-file redis.dh

# Configure a CA certificate(s) bundle or directory to authenticate TLS/SSL
# clients and peers.  Redis requires an explicit configuration of at least one
# of these, and will not implicitly use the system wide configuration.
#
# tls-ca-cert-file ca.crt
# tls-ca-cert-dir /etc/ssl/certs

# By default, clients (including replica servers) on a TLS port are required
# to authenticate using valid client side certificates.
#
# If "no" is specified, client certificates are not required and not accepted.
# If "optional" is specified, client certificates are accepted and must be
# valid if provided, but are not required.
#
# tls-auth-clients no
# tls-auth-clients optional

# By default, a Redis replica does not attempt to establish a TLS connection
# with its master.
#
# Use the following directive to enable TLS on replication links.
#
# tls-replication yes

# By default, the Redis Cluster bus uses a plain TCP connection. To enable
# TLS for the bus protocol, use the following directive:
#
# tls-cluster yes

# Explicitly specify TLS versions to support. Allowed values are case insensitive
# and include "TLSv1", "TLSv1.1", "TLSv1.2", "TLSv1.3" (OpenSSL >= 1.1.1) or
# any combination. To enable only TLSv1.2 and TLSv1.3, use:
#
# tls-protocols "TLSv1.2 TLSv1.3"

# Configure allowed ciphers.  See the ciphers(1ssl) manpage for more information
# about the syntax of this string.
#
# Note: this configuration applies only to <= TLSv1.2.
#
# tls-ciphers DEFAULT:!MEDIUM

# Configure allowed TLSv1.3 ciphersuites.  See the ciphers(1ssl) manpage for more
# information about the syntax of this string, and specifically for TLSv1.3
# ciphersuites.
#
# tls-ciphersuites TLS_CHACHA20_POLY1305_SHA256

# When choosing a cipher, use the server's preference instead of the client
# preference. By default, the server follows the client's preference.
#
# tls-prefer-server-ciphers yes

# By default, TLS session caching is enabled to allow faster and less expensive
# reconnections by clients that support it. Use the following directive to disable
# caching.
#
# tls-session-caching no

# Change the default number of TLS sessions cached. A zero value sets the cache
# to unlimited size. The default size is 20480.
#
# tls-session-cache-size 5000

# Change the default timeout of cached TLS sessions. The default timeout is 300
# seconds.
#
# tls-session-cache-timeout 60

################################# GENERAL #####################################

# By default Redis does not run as a daemon. Use 'yes' if you need it.
# Note that Redis will write a pid file in /var/run/redis.pid when daemonized.
daemonize no

# If you run Redis from upstart or systemd, Redis can interact with your
# supervision tree. Options:
#   supervised no      - no supervision interaction
#   supervised upstart - signal upstart by putting Redis into SIGSTOP mode
#   supervised systemd - signal systemd by writing READY=1 to $NOTIFY_SOCKET
#   supervised auto    - detect upstart or systemd method based on
#                        UPSTART_JOB or NOTIFY_SOCKET environment variables
# Note: these supervision methods only signal "process is ready."
#       They do not enable continuous liveness pings back to your supervisor.
supervised no

# If a pid file is specified, Redis writes it where specified at startup
# and removes it at exit.
#
# When the server runs non daemonized, no pid file is created if none is
# specified in the configuration. When the server is daemonized, the pid file
# is used even if not specified, defaulting to "/var/run/redis.pid".
#
# Creating a pid file is best effort: if Redis is not able to create it
# nothing bad happens, the server will start and run normally.
pidfile /var/run/redis_6379.pid

# Specify the server verbosity level.
# This can be one of:
# debug (a lot of information, useful for development/testing)
# verbose (many rarely useful info, but not a mess like the debug level)
# notice (moderately verbose, what you want in production probably)
# warning (only very important / critical messages are logged)
loglevel notice

# Specify the log file name. Also the empty string can be used to force
# Redis to log on the standard output. Note that if you use standard
# output for logging but daemonize, logs will be sent to /dev/null
logfile ""

# To enable logging to the system logger, just set 'syslog-enabled' to yes,
# and optionally update the other syslog parameters to suit your needs.
# syslog-enabled no

# Specify the syslog identity.
# syslog-ident redis

# Specify the syslog facility. Must be USER or between LOCAL0-LOCAL7.
# syslog-facility local0

# Set the number of databases. The default database is DB 0, you can select
# a different one on a per-connection basis using SELECT <dbid> where
# dbid is a number between 0 and 'databases'-1
databases 16

# By default Redis shows an ASCII art logo only when started to log to the
# standard output and if the standard output is a TTY. Basically this means
# that normally a logo is displayed only in interactive sessions.
#
# However it is possible to force the pre-4.0 behavior and always show a
# ASCII art logo in startup logs by setting the following option to yes.
always-show-logo yes

################################ SNAPSHOTTING  ################################
#
# Save the DB on disk:
#
#   save <seconds> <changes>
#
#   Will save the DB if both the given number of seconds and the given
#   number of write operations against the DB occurred.
#
#   In the example below the behaviour will be to save:
#   after 900 sec (15 min) if at least 1 key changed
#   after 300 sec (5 min) if at least 10 keys changed
#   after 60 sec if at least 10000 keys changed
#
#   Note: you can disable saving completely by commenting out all "save" lines.
#
#   It is also possible to remove all the previously configured save
#   points by adding a save directive with a single empty string argument
#   like in the following example:
#
#   save ""

save 900 1
save 300 10
save 60 10000

# By default Redis will stop accepting writes if RDB snapshots are enabled
# (at least one save point) and the latest background save failed.
# This will make the user aware (in a hard way) that data is not persisting
# on disk properly, otherwise chances are that no one will notice and some
# disaster will happen.
#
# If the background saving process will start working again Redis will
# automatically allow writes again.
#
# However if you have setup your proper monitoring of the Redis server
# and persistence, you may want to disable this feature so that Redis will
# continue to work as usual even if there are problems with disk,
# permissions, and so forth.
stop-writes-on-bgsave-error yes

# Compress string objects using LZF when dump .rdb databases?
# For default that's set to 'yes' as it's almost always a win.
# If you want to save some CPU in the saving child set it to 'no' but
# the dataset will likely be bigger if you have compressible values or keys.
rdbcompression yes

# Since version 5 of RDB a CRC64 checksum is placed at the end of the file.
# This makes the format more resistant to corruption but there is a performance
# hit to pay (around 10%) when saving and loading RDB files, so you can disable it
# for maximum performances.
#
# RDB files created with checksum disabled have a checksum of zero that will
# tell the loading code to skip the check.
rdbchecksum yes

# The filename where to dump the DB
dbfilename dump.rdb

# Remove RDB files used by replication in instances without persistence
# enabled. By default this option is disabled, however there are environments
# where for regulations or other security concerns, RDB files persisted on
# disk by masters in order to feed replicas, or stored on disk by replicas
# in order to load them for the initial synchronization, should be deleted
# ASAP. Note that this option ONLY WORKS in instances that have both AOF
# and RDB persistence disabled, otherwise is completely ignored.
#
# An alternative (and sometimes better) way to obtain the same effect is
# to use diskless replication on both master and replicas instances. However
# in the case of replicas, diskless is not always an option.
rdb-del-sync-files no

# The working directory.
#
# The DB will be written inside this directory, with the filename specified
# above using the 'dbfilename' configuration directive.
#
# The Append Only File will also be created inside this directory.
#
# Note that you must specify a directory here, not a file name.
dir ./

################################# REPLICATION #################################

# Master-Replica replication. Use replicaof to make a Redis instance a copy of
# another Redis server. A few things to understand ASAP about Redis replication.
#
#   +------------------+      +---------------+
#   |      Master      | ---> |    Replica    |
#   | (receive writes) |      |  (exact copy) |
#   +------------------+      +---------------+
#
# 1) Redis replication is asynchronous, but you can configure a master to
#    stop accepting writes if it appears to be not connected with at least
#    a given number of replicas.
# 2) Redis replicas are able to perform a partial resynchronization with the
#    master if the replication link is lost for a relatively small amount of
#    time. You may want to configure the replication backlog size (see the next
#    sections of this file) with a sensible value depending on your needs.
# 3) Replication is automatic and does not need user intervention. After a
#    network partition replicas automatically try to reconnect to masters
#    and resynchronize with them.
#
# replicaof <masterip> <masterport>

# If the master is password protected (using the "requirepass" configuration
# directive below) it is possible to tell the replica to authenticate before
# starting the replication synchronization process, otherwise the master will
# refuse the replica request.
#
# masterauth <master-password>
#
# However this is not enough if you are using Redis ACLs (for Redis version
# 6 or greater), and the default user is not capable of running the PSYNC
# command and/or other commands needed for replication. In this case it's
# better to configure a special user to use with replication, and specify the
# masteruser configuration as such:
#
# masteruser <username>
#
# When masteruser is specified, the replica will authenticate against its
# master using the new AUTH form: AUTH <username> <password>.

# When a replica loses its connection with the master, or when the replication
# is still in progress, the replica can act in two different ways:
#
# 1) if replica-serve-stale-data is set to 'yes' (the default) the replica will
#    still reply to client requests, possibly with out of date data, or the
#    data set may just be empty if this is the first synchronization.
#
# 2) if replica-serve-stale-data is set to 'no' the replica will reply with
#    an error "SYNC with master in progress" to all the kind of commands
#    but to INFO, replicaOF, AUTH, PING, SHUTDOWN, REPLCONF, ROLE, CONFIG,
#    SUBSCRIBE, UNSUBSCRIBE, PSUBSCRIBE, PUNSUBSCRIBE, PUBLISH, PUBSUB,
#    COMMAND, POST, HOST: and LATENCY.
#
replica-serve-stale-data yes

# You can configure a replica instance to accept writes or not. Writing against
# a replica instance may be useful to store some ephemeral data (because data
# written on a replica will be easily deleted after resync with the master) but
# may also cause problems if clients are writing to it because of a
# misconfiguration.
#
# Since Redis 2.6 by default replicas are read-only.
#
# Note: read only replicas are not designed to be exposed to untrusted clients
# on the internet. It's just a protection layer against misuse of the instance.
# Still a read only replica exports by default all the administrative commands
# such as CONFIG, DEBUG, and so forth. To a limited extent you can improve
# security of read only replicas using 'rename-command' to shadow all the
# administrative / dangerous commands.
replica-read-only yes

# Replication SYNC strategy: disk or socket.
#
# New replicas and reconnecting replicas that are not able to continue the
# replication process just receiving differences, need to do what is called a
# "full synchronization". An RDB file is transmitted from the master to the
# replicas.
#
# The transmission can happen in two different ways:
#
# 1) Disk-backed: The Redis master creates a new process that writes the RDB
#                 file on disk. Later the file is transferred by the parent
#                 process to the replicas incrementally.
# 2) Diskless: The Redis master creates a new process that directly writes the
#              RDB file to replica sockets, without touching the disk at all.
#
# With disk-backed replication, while the RDB file is generated, more replicas
# can be queued and served with the RDB file as soon as the current child
# producing the RDB file finishes its work. With diskless replication instead
# once the transfer starts, new replicas arriving will be queued and a new
# transfer will start when the current one terminates.
#
# When diskless replication is used, the master waits a configurable amount of
# time (in seconds) before starting the transfer in the hope that multiple
# replicas will arrive and the transfer can be parallelized.
#
# With slow disks and fast (large bandwidth) networks, diskless replication
# works better.
repl-diskless-sync no

# When diskless replication is enabled, it is possible to configure the delay
# the server waits in order to spawn the child that transfers the RDB via socket
# to the replicas.
#
# This is important since once the transfer starts, it is not possible to serve
# new replicas arriving, that will be queued for the next RDB transfer, so the
# server waits a delay in order to let more replicas arrive.
#
# The delay is specified in seconds, and by default is 5 seconds. To disable
# it entirely just set it to 0 seconds and the transfer will start ASAP.
repl-diskless-sync-delay 5

# -----------------------------------------------------------------------------
# WARNING: RDB diskless load is experimental. Since in this setup the replica
# does not immediately store an RDB on disk, it may cause data loss during
# failovers. RDB diskless load + Redis modules not handling I/O reads may also
# cause Redis to abort in case of I/O errors during the initial synchronization
# stage with the master. Use only if your do what you are doing.
# -----------------------------------------------------------------------------
#
# Replica can load the RDB it reads from the replication link directly from the
# socket, or store the RDB to a file and read that file after it was completely
# recived from the master.
#
# In many cases the disk is slower than the network, and storing and loading
# the RDB file may increase replication time (and even increase the master's
# Copy on Write memory and salve buffers).
# However, parsing the RDB file directly from the socket may mean that we have
# to flush the contents of the current database before the full rdb was
# received. For this reason we have the following options:
#
# "disabled"    - Don't use diskless load (store the rdb file to the disk first)
# "on-empty-db" - Use diskless load only when it is completely safe.
# "swapdb"      - Keep a copy of the current db contents in RAM while parsing
#                 the data directly from the socket. note that this requires
#                 sufficient memory, if you don't have it, you risk an OOM kill.
repl-diskless-load disabled

# Replicas send PINGs to server in a predefined interval. It's possible to
# change this interval with the repl_ping_replica_period option. The default
# value is 10 seconds.
#
# repl-ping-replica-period 10

# The following option sets the replication timeout for:
#
# 1) Bulk transfer I/O during SYNC, from the point of view of replica.
# 2) Master timeout from the point of view of replicas (data, pings).
# 3) Replica timeout from the point of view of masters (REPLCONF ACK pings).
#
# It is important to make sure that this value is greater than the value
# specified for repl-ping-replica-period otherwise a timeout will be detected
# every time there is low traffic between the master and the replica.
#
# repl-timeout 60

# Disable TCP_NODELAY on the replica socket after SYNC?
#
# If you select "yes" Redis will use a smaller number of TCP packets and
# less bandwidth to send data to replicas. But this can add a delay for
# the data to appear on the replica side, up to 40 milliseconds with
# Linux kernels using a default configuration.
#
# If you select "no" the delay for data to appear on the replica side will
# be reduced but more bandwidth will be used for replication.
#
# By default we optimize for low latency, but in very high traffic conditions
# or when the master and replicas are many hops away, turning this to "yes" may
# be a good idea.
repl-disable-tcp-nodelay no

# Set the replication backlog size. The backlog is a buffer that accumulates
# replica data when replicas are disconnected for some time, so that when a
# replica wants to reconnect again, often a full resync is not needed, but a
# partial resync is enough, just passing the portion of data the replica
# missed while disconnected.
#
# The bigger the replication backlog, the longer the time the replica can be
# disconnected and later be able to perform a partial resynchronization.
#
# The backlog is only allocated once there is at least a replica connected.
#
# repl-backlog-size 1mb

# After a master has no longer connected replicas for some time, the backlog
# will be freed. The following option configures the amount of seconds that
# need to elapse, starting from the time the last replica disconnected, for
# the backlog buffer to be freed.
#
# Note that replicas never free the backlog for timeout, since they may be
# promoted to masters later, and should be able to correctly "partially
# resynchronize" with the replicas: hence they should always accumulate backlog.
#
# A value of 0 means to never release the backlog.
#
# repl-backlog-ttl 3600

# The replica priority is an integer number published by Redis in the INFO
# output. It is used by Redis Sentinel in order to select a replica to promote
# into a master if the master is no longer working correctly.
#
# A replica with a low priority number is considered better for promotion, so
# for instance if there are three replicas with priority 10, 100, 25 Sentinel
# will pick the one with priority 10, that is the lowest.
#
# However a special priority of 0 marks the replica as not able to perform the
# role of master, so a replica with priority of 0 will never be selected by
# Redis Sentinel for promotion.
#
# By default the priority is 100.
replica-priority 100

# It is possible for a master to stop accepting writes if there are less than
# N replicas connected, having a lag less or equal than M seconds.
#
# The N replicas need to be in "online" state.
#
# The lag in seconds, that must be <= the specified value, is calculated from
# the last ping received from the replica, that is usually sent every second.
#
# This option does not GUARANTEE that N replicas will accept the write, but
# will limit the window of exposure for lost writes in case not enough replicas
# are available, to the specified number of seconds.
#
# For example to require at least 3 replicas with a lag <= 10 seconds use:
#
# min-replicas-to-write 3
# min-replicas-max-lag 10
#
# Setting one or the other to 0 disables the feature.
#
# By default min-replicas-to-write is set to 0 (feature disabled) and
# min-replicas-max-lag is set to 10.

# A Redis master is able to list the address and port of the attached
# replicas in different ways. For example the "INFO replication" section
# offers this information, which is used, among other tools, by
# Redis Sentinel in order to discover replica instances.
# Another place where this info is available is in the output of the
# "ROLE" command of a master.
#
# The listed IP and address normally reported by a replica is obtained
# in the following way:
#
#   IP: The address is auto detected by checking the peer address
#   of the socket used by the replica to connect with the master.
#
#   Port: The port is communicated by the replica during the replication
#   handshake, and is normally the port that the replica is using to
#   listen for connections.
#
# However when port forwarding or Network Address Translation (NAT) is
# used, the replica may be actually reachable via different IP and port
# pairs. The following two options can be used by a replica in order to
# report to its master a specific set of IP and port, so that both INFO
# and ROLE will report those values.
#
# There is no need to use both the options if you need to override just
# the port or the IP address.
#
# replica-announce-ip 5.5.5.5
# replica-announce-port 1234

############################### KEYS TRACKING #################################

# Redis implements server assisted support for client side caching of values.
# This is implemented using an invalidation table that remembers, using
# 16 millions of slots, what clients may have certain subsets of keys. In turn
# this is used in order to send invalidation messages to clients. Please
# to understand more about the feature check this page:
#
#   https://redis.io/topics/client-side-caching
#
# When tracking is enabled for a client, all the read only queries are assumed
# to be cached: this will force Redis to store information in the invalidation
# table. When keys are modified, such information is flushed away, and
# invalidation messages are sent to the clients. However if the workload is
# heavily dominated by reads, Redis could use more and more memory in order
# to track the keys fetched by many clients.
#
# For this reason it is possible to configure a maximum fill value for the
# invalidation table. By default it is set to 1M of keys, and once this limit
# is reached, Redis will start to evict keys in the invalidation table
# even if they were not modified, just to reclaim memory: this will in turn
# force the clients to invalidate the cached values. Basically the table
# maximum size is a trade off between the memory you want to spend server
# side to track information about who cached what, and the ability of clients
# to retain cached objects in memory.
#
# If you set the value to 0, it means there are no limits, and Redis will
# retain as many keys as needed in the invalidation table.
# In the "stats" INFO section, you can find information about the number of
# keys in the invalidation table at every given moment.
#
# Note: when key tracking is used in broadcasting mode, no memory is used
# in the server side so this setting is useless.
#
# tracking-table-max-keys 1000000

################################## SECURITY ###################################

# Warning: since Redis is pretty fast an outside user can try up to
# 1 million passwords per second against a modern box. This means that you
# should use very strong passwords, otherwise they will be very easy to break.
# Note that because the password is really a shared secret between the client
# and the server, and should not be memorized by any human, the password
# can be easily a long string from /dev/urandom or whatever, so by using a
# long and unguessable password no brute force attack will be possible.

# Redis ACL users are defined in the following format:
#
#   user <username> ... acl rules ...
#
# For example:
#
#   user worker +@list +@connection ~jobs:* on >ffa9203c493aa99
#
# The special username "default" is used for new connections. If this user
# has the "nopass" rule, then new connections will be immediately authenticated
# as the "default" user without the need of any password provided via the
# AUTH command. Otherwise if the "default" user is not flagged with "nopass"
# the connections will start in not authenticated state, and will require
# AUTH (or the HELLO command AUTH option) in order to be authenticated and
# start to work.
#
# The ACL rules that describe what an user can do are the following:
#
#  on           Enable the user: it is possible to authenticate as this user.
#  off          Disable the user: it's no longer possible to authenticate
#               with this user, however the already authenticated connections
#               will still work.
#  +<command>   Allow the execution of that command
#  -<command>   Disallow the execution of that command
#  +@<category> Allow the execution of all the commands in such category
#               with valid categories are like @admin, @set, @sortedset, ...
#               and so forth, see the full list in the server.c file where
#               the Redis command table is described and defined.
#               The special category @all means all the commands, but currently
#               present in the server, and that will be loaded in the future
#               via modules.
#  +<command>|subcommand    Allow a specific subcommand of an otherwise
#                           disabled command. Note that this form is not
#                           allowed as negative like -DEBUG|SEGFAULT, but
#                           only additive starting with "+".
#  allcommands  Alias for +@all. Note that it implies the ability to execute
#               all the future commands loaded via the modules system.
#  nocommands   Alias for -@all.
#  ~<pattern>   Add a pattern of keys that can be mentioned as part of
#               commands. For instance ~* allows all the keys. The pattern
#               is a glob-style pattern like the one of KEYS.
#               It is possible to specify multiple patterns.
#  allkeys      Alias for ~*
#  resetkeys    Flush the list of allowed keys patterns.
#  ><password>  Add this passowrd to the list of valid password for the user.
#               For example >mypass will add "mypass" to the list.
#               This directive clears the "nopass" flag (see later).
#  <<password>  Remove this password from the list of valid passwords.
#  nopass       All the set passwords of the user are removed, and the user
#               is flagged as requiring no password: it means that every
#               password will work against this user. If this directive is
#               used for the default user, every new connection will be
#               immediately authenticated with the default user without
#               any explicit AUTH command required. Note that the "resetpass"
#               directive will clear this condition.
#  resetpass    Flush the list of allowed passwords. Moreover removes the
#               "nopass" status. After "resetpass" the user has no associated
#               passwords and there is no way to authenticate without adding
#               some password (or setting it as "nopass" later).
#  reset        Performs the following actions: resetpass, resetkeys, off,
#               -@all. The user returns to the same state it has immediately
#               after its creation.
#
# ACL rules can be specified in any order: for instance you can start with
# passwords, then flags, or key patterns. However note that the additive
# and subtractive rules will CHANGE MEANING depending on the ordering.
# For instance see the following example:
#
#   user alice on +@all -DEBUG ~* >somepassword
#
# This will allow "alice" to use all the commands with the exception of the
# DEBUG command, since +@all added all the commands to the set of the commands
# alice can use, and later DEBUG was removed. However if we invert the order
# of two ACL rules the result will be different:
#
#   user alice on -DEBUG +@all ~* >somepassword
#
# Now DEBUG was removed when alice had yet no commands in the set of allowed
# commands, later all the commands are added, so the user will be able to
# execute everything.
#
# Basically ACL rules are processed left-to-right.
#
# For more information about ACL configuration please refer to
# the Redis web site at https://redis.io/topics/acl

# ACL LOG
#
# The ACL Log tracks failed commands and authentication events associated
# with ACLs. The ACL Log is useful to troubleshoot failed commands blocked
# by ACLs. The ACL Log is stored in memory. You can reclaim memory with
# ACL LOG RESET. Define the maximum entry length of the ACL Log below.
acllog-max-len 128

# Using an external ACL file
#
# Instead of configuring users here in this file, it is possible to use
# a stand-alone file just listing users. The two methods cannot be mixed:
# if you configure users here and at the same time you activate the exteranl
# ACL file, the server will refuse to start.
#
# The format of the external ACL user file is exactly the same as the
# format that is used inside redis.conf to describe users.
#
# aclfile /etc/redis/users.acl

# IMPORTANT NOTE: starting with Redis 6 "requirepass" is just a compatiblity
# layer on top of the new ACL system. The option effect will be just setting
# the password for the default user. Clients will still authenticate using
# AUTH <password> as usually, or more explicitly with AUTH default <password>
# if they follow the new protocol: both will work.
#
# requirepass foobared

# Command renaming (DEPRECATED).
#
# ------------------------------------------------------------------------
# WARNING: avoid using this option if possible. Instead use ACLs to remove
# commands from the default user, and put them only in some admin user you
# create for administrative purposes.
# ------------------------------------------------------------------------
#
# It is possible to change the name of dangerous commands in a shared
# environment. For instance the CONFIG command may be renamed into something
# hard to guess so that it will still be available for internal-use tools
# but not available for general clients.
#
# Example:
#
# rename-command CONFIG b840fc02d524045429941cc15f59e41cb7be6c52
#
# It is also possible to completely kill a command by renaming it into
# an empty string:
#
# rename-command CONFIG ""
#
# Please note that changing the name of commands that are logged into the
# AOF file or transmitted to replicas may cause problems.

################################### CLIENTS ####################################

# Set the max number of connected clients at the same time. By default
# this limit is set to 10000 clients, however if the Redis server is not
# able to configure the process file limit to allow for the specified limit
# the max number of allowed clients is set to the current file limit
# minus 32 (as Redis reserves a few file descriptors for internal uses).
#
# Once the limit is reached Redis will close all the new connections sending
# an error 'max number of clients reached'.
#
# IMPORTANT: When Redis Cluster is used, the max number of connections is also
# shared with the cluster bus: every node in the cluster will use two
# connections, one incoming and another outgoing. It is important to size the
# limit accordingly in case of very large clusters.
#
# maxclients 10000

############################## MEMORY MANAGEMENT ################################

# Set a memory usage limit to the specified amount of bytes.
# When the memory limit is reached Redis will try to remove keys
# according to the eviction policy selected (see maxmemory-policy).
#
# If Redis can't remove keys according to the policy, or if the policy is
# set to 'noeviction', Redis will start to reply with errors to commands
# that would use more memory, like SET, LPUSH, and so on, and will continue
# to reply to read-only commands like GET.
#
# This option is usually useful when using Redis as an LRU or LFU cache, or to
# set a hard memory limit for an instance (using the 'noeviction' policy).
#
# WARNING: If you have replicas attached to an instance with maxmemory on,
# the size of the output buffers needed to feed the replicas are subtracted
# from the used memory count, so that network problems / resyncs will
# not trigger a loop where keys are evicted, and in turn the output
# buffer of replicas is full with DELs of keys evicted triggering the deletion
# of more keys, and so forth until the database is completely emptied.
#
# In short... if you have replicas attached it is suggested that you set a lower
# limit for maxmemory so that there is some free RAM on the system for replica
# output buffers (but this is not needed if the policy is 'noeviction').
#
# maxmemory <bytes>

# MAXMEMORY POLICY: how Redis will select what to remove when maxmemory
# is reached. You can select one from the following behaviors:
#
# volatile-lru -> Evict using approximated LRU, only keys with an expire set.
# allkeys-lru -> Evict any key using approximated LRU.
# volatile-lfu -> Evict using approximated LFU, only keys with an expire set.
# allkeys-lfu -> Evict any key using approximated LFU.
# volatile-random -> Remove a random key having an expire set.
# allkeys-random -> Remove a random key, any key.
# volatile-ttl -> Remove the key with the nearest expire time (minor TTL)
# noeviction -> Don't evict anything, just return an error on write operations.
#
# LRU means Least Recently Used
# LFU means Least Frequently Used
#
# Both LRU, LFU and volatile-ttl are implemented using approximated
# randomized algorithms.
#
# Note: with any of the above policies, Redis will return an error on write
#       operations, when there are no suitable keys for eviction.
#
#       At the date of writing these commands are: set setnx setex append
#       incr decr rpush lpush rpushx lpushx linsert lset rpoplpush sadd
#       sinter sinterstore sunion sunionstore sdiff sdiffstore zadd zincrby
#       zunionstore zinterstore hset hsetnx hmset hincrby incrby decrby
#       getset mset msetnx exec sort
#
# The default is:
#
# maxmemory-policy noeviction

# LRU, LFU and minimal TTL algorithms are not precise algorithms but approximated
# algorithms (in order to save memory), so you can tune it for speed or
# accuracy. For default Redis will check five keys and pick the one that was
# used less recently, you can change the sample size using the following
# configuration directive.
#
# The default of 5 produces good enough results. 10 Approximates very closely
# true LRU but costs more CPU. 3 is faster but not very accurate.
#
# maxmemory-samples 5

# Starting from Redis 5, by default a replica will ignore its maxmemory setting
# (unless it is promoted to master after a failover or manually). It means
# that the eviction of keys will be just handled by the master, sending the
# DEL commands to the replica as keys evict in the master side.
#
# This behavior ensures that masters and replicas stay consistent, and is usually
# what you want, however if your replica is writable, or you want the replica
# to have a different memory setting, and you are sure all the writes performed
# to the replica are idempotent, then you may change this default (but be sure
# to understand what you are doing).
#
# Note that since the replica by default does not evict, it may end using more
# memory than the one set via maxmemory (there are certain buffers that may
# be larger on the replica, or data structures may sometimes take more memory
# and so forth). So make sure you monitor your replicas and make sure they
# have enough memory to never hit a real out-of-memory condition before the
# master hits the configured maxmemory setting.
#
# replica-ignore-maxmemory yes

# Redis reclaims expired keys in two ways: upon access when those keys are
# found to be expired, and also in background, in what is called the
# "active expire key". The key space is slowly and interactively scanned
# looking for expired keys to reclaim, so that it is possible to free memory
# of keys that are expired and will never be accessed again in a short time.
#
# The default effort of the expire cycle will try to avoid having more than
# ten percent of expired keys still in memory, and will try to avoid consuming
# more than 25% of total memory and to add latency to the system. However
# it is possible to increase the expire "effort" that is normally set to
# "1", to a greater value, up to the value "10". At its maximum value the
# system will use more CPU, longer cycles (and technically may introduce
# more latency), and will tollerate less already expired keys still present
# in the system. It's a tradeoff betweeen memory, CPU and latecy.
#
# active-expire-effort 1

############################# LAZY FREEING ####################################

# Redis has two primitives to delete keys. One is called DEL and is a blocking
# deletion of the object. It means that the server stops processing new commands
# in order to reclaim all the memory associated with an object in a synchronous
# way. If the key deleted is associated with a small object, the time needed
# in order to execute the DEL command is very small and comparable to most other
# O(1) or O(log_N) commands in Redis. However if the key is associated with an
# aggregated value containing millions of elements, the server can block for
# a long time (even seconds) in order to complete the operation.
#
# For the above reasons Redis also offers non blocking deletion primitives
# such as UNLINK (non blocking DEL) and the ASYNC option of FLUSHALL and
# FLUSHDB commands, in order to reclaim memory in background. Those commands
# are executed in constant time. Another thread will incrementally free the
# object in the background as fast as possible.
#
# DEL, UNLINK and ASYNC option of FLUSHALL and FLUSHDB are user-controlled.
# It's up to the design of the application to understand when it is a good
# idea to use one or the other. However the Redis server sometimes has to
# delete keys or flush the whole database as a side effect of other operations.
# Specifically Redis deletes objects independently of a user call in the
# following scenarios:
#
# 1) On eviction, because of the maxmemory and maxmemory policy configurations,
#    in order to make room for new data, without going over the specified
#    memory limit.
# 2) Because of expire: when a key with an associated time to live (see the
#    EXPIRE command) must be deleted from memory.
# 3) Because of a side effect of a command that stores data on a key that may
#    already exist. For example the RENAME command may delete the old key
#    content when it is replaced with another one. Similarly SUNIONSTORE
#    or SORT with STORE option may delete existing keys. The SET command
#    itself removes any old content of the specified key in order to replace
#    it with the specified string.
# 4) During replication, when a replica performs a full resynchronization with
#    its master, the content of the whole database is removed in order to
#    load the RDB file just transferred.
#
# In all the above cases the default is to delete objects in a blocking way,
# like if DEL was called. However you can configure each case specifically
# in order to instead release memory in a non-blocking way like if UNLINK
# was called, using the following configuration directives.

lazyfree-lazy-eviction no
lazyfree-lazy-expire no
lazyfree-lazy-server-del no
replica-lazy-flush no

# It is also possible, for the case when to replace the user code DEL calls
# with UNLINK calls is not easy, to modify the default behavior of the DEL
# command to act exactly like UNLINK, using the following configuration
# directive:

lazyfree-lazy-user-del no

################################ THREADED I/O #################################

# Redis is mostly single threaded, however there are certain threaded
# operations such as UNLINK, slow I/O accesses and other things that are
# performed on side threads.
#
# Now it is also possible to handle Redis clients socket reads and writes
# in different I/O threads. Since especially writing is so slow, normally
# Redis users use pipelining in order to speedup the Redis performances per
# core, and spawn multiple instances in order to scale more. Using I/O
# threads it is possible to easily speedup two times Redis without resorting
# to pipelining nor sharding of the instance.
#
# By default threading is disabled, we suggest enabling it only in machines
# that have at least 4 or more cores, leaving at least one spare core.
# Using more than 8 threads is unlikely to help much. We also recommend using
# threaded I/O only if you actually have performance problems, with Redis
# instances being able to use a quite big percentage of CPU time, otherwise
# there is no point in using this feature.
#
# So for instance if you have a four cores boxes, try to use 2 or 3 I/O
# threads, if you have a 8 cores, try to use 6 threads. In order to
# enable I/O threads use the following configuration directive:
#
# io-threads 4
#
# Setting io-threads to 1 will just use the main thread as usually.
# When I/O threads are enabled, we only use threads for writes, that is
# to thread the write(2) syscall and transfer the client buffers to the
# socket. However it is also possible to enable threading of reads and
# protocol parsing using the following configuration directive, by setting
# it to yes:
#
# io-threads-do-reads no
#
# Usually threading reads doesn't help much.
#
# NOTE 1: This configuration directive cannot be changed at runtime via
# CONFIG SET. Aso this feature currently does not work when SSL is
# enabled.
#
# NOTE 2: If you want to test the Redis speedup using redis-benchmark, make
# sure you also run the benchmark itself in threaded mode, using the
# --threads option to match the number of Redis theads, otherwise you'll not
# be able to notice the improvements.

############################ KERNEL OOM CONTROL ##############################

# On Linux, it is possible to hint the kernel OOM killer on what processes
# should be killed first when out of memory.
#
# Enabling this feature makes Redis actively control the oom_score_adj value
# for all its processes, depending on their role. The default scores will
# attempt to have background child processes killed before all others, and
# replicas killed before masters.

oom-score-adj no

# When oom-score-adj is used, this directive controls the specific values used
# for master, replica and background child processes. Values range -1000 to
# 1000 (higher means more likely to be killed).
#
# Unprivileged processes (not root, and without CAP_SYS_RESOURCE capabilities)
# can freely increase their value, but not decrease it below its initial
# settings.
#
# Values are used relative to the initial value of oom_score_adj when the server
# starts. Because typically the initial value is 0, they will often match the
# absolute values.

oom-score-adj-values 0 200 800

############################## APPEND ONLY MODE ###############################

# By default Redis asynchronously dumps the dataset on disk. This mode is
# good enough in many applications, but an issue with the Redis process or
# a power outage may result into a few minutes of writes lost (depending on
# the configured save points).
#
# The Append Only File is an alternative persistence mode that provides
# much better durability. For instance using the default data fsync policy
# (see later in the config file) Redis can lose just one second of writes in a
# dramatic event like a server power outage, or a single write if something
# wrong with the Redis process itself happens, but the operating system is
# still running correctly.
#
# AOF and RDB persistence can be enabled at the same time without problems.
# If the AOF is enabled on startup Redis will load the AOF, that is the file
# with the better durability guarantees.
#
# Please check http://redis.io/topics/persistence for more information.

appendonly no

# The name of the append only file (default: "appendonly.aof")

appendfilename "appendonly.aof"

# The fsync() call tells the Operating System to actually write data on disk
# instead of waiting for more data in the output buffer. Some OS will really flush
# data on disk, some other OS will just try to do it ASAP.
#
# Redis supports three different modes:
#
# no: don't fsync, just let the OS flush the data when it wants. Faster.
# always: fsync after every write to the append only log. Slow, Safest.
# everysec: fsync only one time every second. Compromise.
#
# The default is "everysec", as that's usually the right compromise between
# speed and data safety. It's up to you to understand if you can relax this to
# "no" that will let the operating system flush the output buffer when
# it wants, for better performances (but if you can live with the idea of
# some data loss consider the default persistence mode that's snapshotting),
# or on the contrary, use "always" that's very slow but a bit safer than
# everysec.
#
# More details please check the following article:
# http://antirez.com/post/redis-persistence-demystified.html
#
# If unsure, use "everysec".

# appendfsync always
appendfsync everysec
# appendfsync no

# When the AOF fsync policy is set to always or everysec, and a background
# saving process (a background save or AOF log background rewriting) is
# performing a lot of I/O against the disk, in some Linux configurations
# Redis may block too long on the fsync() call. Note that there is no fix for
# this currently, as even performing fsync in a different thread will block
# our synchronous write(2) call.
#
# In order to mitigate this problem it's possible to use the following option
# that will prevent fsync() from being called in the main process while a
# BGSAVE or BGREWRITEAOF is in progress.
#
# This means that while another child is saving, the durability of Redis is
# the same as "appendfsync none". In practical terms, this means that it is
# possible to lose up to 30 seconds of log in the worst scenario (with the
# default Linux settings).
#
# If you have latency problems turn this to "yes". Otherwise leave it as
# "no" that is the safest pick from the point of view of durability.

no-appendfsync-on-rewrite no

# Automatic rewrite of the append only file.
# Redis is able to automatically rewrite the log file implicitly calling
# BGREWRITEAOF when the AOF log size grows by the specified percentage.
#
# This is how it works: Redis remembers the size of the AOF file after the
# latest rewrite (if no rewrite has happened since the restart, the size of
# the AOF at startup is used).
#
# This base size is compared to the current size. If the current size is
# bigger than the specified percentage, the rewrite is triggered. Also
# you need to specify a minimal size for the AOF file to be rewritten, this
# is useful to avoid rewriting the AOF file even if the percentage increase
# is reached but it is still pretty small.
#
# Specify a percentage of zero in order to disable the automatic AOF
# rewrite feature.

auto-aof-rewrite-percentage 100
auto-aof-rewrite-min-size 64mb

# An AOF file may be found to be truncated at the end during the Redis
# startup process, when the AOF data gets loaded back into memory.
# This may happen when the system where Redis is running
# crashes, especially when an ext4 filesystem is mounted without the
# data=ordered option (however this can't happen when Redis itself
# crashes or aborts but the operating system still works correctly).
#
# Redis can either exit with an error when this happens, or load as much
# data as possible (the default now) and start if the AOF file is found
# to be truncated at the end. The following option controls this behavior.
#
# If aof-load-truncated is set to yes, a truncated AOF file is loaded and
# the Redis server starts emitting a log to inform the user of the event.
# Otherwise if the option is set to no, the server aborts with an error
# and refuses to start. When the option is set to no, the user requires
# to fix the AOF file using the "redis-check-aof" utility before to restart
# the server.
#
# Note that if the AOF file will be found to be corrupted in the middle
# the server will still exit with an error. This option only applies when
# Redis will try to read more data from the AOF file but not enough bytes
# will be found.
aof-load-truncated yes

# When rewriting the AOF file, Redis is able to use an RDB preamble in the
# AOF file for faster rewrites and recoveries. When this option is turned
# on the rewritten AOF file is composed of two different stanzas:
#
#   [RDB file][AOF tail]
#
# When loading Redis recognizes that the AOF file starts with the "REDIS"
# string and loads the prefixed RDB file, and continues loading the AOF
# tail.
aof-use-rdb-preamble yes

################################ LUA SCRIPTING  ###############################

# Max execution time of a Lua script in milliseconds.
#
# If the maximum execution time is reached Redis will log that a script is
# still in execution after the maximum allowed time and will start to
# reply to queries with an error.
#
# When a long running script exceeds the maximum execution time only the
# SCRIPT KILL and SHUTDOWN NOSAVE commands are available. The first can be
# used to stop a script that did not yet called write commands. The second
# is the only way to shut down the server in the case a write command was
# already issued by the script but the user doesn't want to wait for the natural
# termination of the script.
#
# Set it to 0 or a negative value for unlimited execution without warnings.
lua-time-limit 5000

################################ REDIS CLUSTER  ###############################

# Normal Redis instances can't be part of a Redis Cluster; only nodes that are
# started as cluster nodes can. In order to start a Redis instance as a
# cluster node enable the cluster support uncommenting the following:
#
# cluster-enabled yes

# Every cluster node has a cluster configuration file. This file is not
# intended to be edited by hand. It is created and updated by Redis nodes.
# Every Redis Cluster node requires a different cluster configuration file.
# Make sure that instances running in the same system do not have
# overlapping cluster configuration file names.
#
# cluster-config-file nodes-6379.conf

# Cluster node timeout is the amount of milliseconds a node must be unreachable
# for it to be considered in failure state.
# Most other internal time limits are multiple of the node timeout.
#
# cluster-node-timeout 15000

# A replica of a failing master will avoid to start a failover if its data
# looks too old.
#
# There is no simple way for a replica to actually have an exact measure of
# its "data age", so the following two checks are performed:
#
# 1) If there are multiple replicas able to failover, they exchange messages
#    in order to try to give an advantage to the replica with the best
#    replication offset (more data from the master processed).
#    Replicas will try to get their rank by offset, and apply to the start
#    of the failover a delay proportional to their rank.
#
# 2) Every single replica computes the time of the last interaction with
#    its master. This can be the last ping or command received (if the master
#    is still in the "connected" state), or the time that elapsed since the
#    disconnection with the master (if the replication link is currently down).
#    If the last interaction is too old, the replica will not try to failover
#    at all.
#
# The point "2" can be tuned by user. Specifically a replica will not perform
# the failover if, since the last interaction with the master, the time
# elapsed is greater than:
#
#   (node-timeout * replica-validity-factor) + repl-ping-replica-period
#
# So for example if node-timeout is 30 seconds, and the replica-validity-factor
# is 10, and assuming a default repl-ping-replica-period of 10 seconds, the
# replica will not try to failover if it was not able to talk with the master
# for longer than 310 seconds.
#
# A large replica-validity-factor may allow replicas with too old data to failover
# a master, while a too small value may prevent the cluster from being able to
# elect a replica at all.
#
# For maximum availability, it is possible to set the replica-validity-factor
# to a value of 0, which means, that replicas will always try to failover the
# master regardless of the last time they interacted with the master.
# (However they'll always try to apply a delay proportional to their
# offset rank).
#
# Zero is the only value able to guarantee that when all the partitions heal
# the cluster will always be able to continue.
#
# cluster-replica-validity-factor 10

# Cluster replicas are able to migrate to orphaned masters, that are masters
# that are left without working replicas. This improves the cluster ability
# to resist to failures as otherwise an orphaned master can't be failed over
# in case of failure if it has no working replicas.
#
# Replicas migrate to orphaned masters only if there are still at least a
# given number of other working replicas for their old master. This number
# is the "migration barrier". A migration barrier of 1 means that a replica
# will migrate only if there is at least 1 other working replica for its master
# and so forth. It usually reflects the number of replicas you want for every
# master in your cluster.
#
# Default is 1 (replicas migrate only if their masters remain with at least
# one replica). To disable migration just set it to a very large value.
# A value of 0 can be set but is useful only for debugging and dangerous
# in production.
#
# cluster-migration-barrier 1

# By default Redis Cluster nodes stop accepting queries if they detect there
# is at least an hash slot uncovered (no available node is serving it).
# This way if the cluster is partially down (for example a range of hash slots
# are no longer covered) all the cluster becomes, eventually, unavailable.
# It automatically returns available as soon as all the slots are covered again.
#
# However sometimes you want the subset of the cluster which is working,
# to continue to accept queries for the part of the key space that is still
# covered. In order to do so, just set the cluster-require-full-coverage
# option to no.
#
# cluster-require-full-coverage yes

# This option, when set to yes, prevents replicas from trying to failover its
# master during master failures. However the master can still perform a
# manual failover, if forced to do so.
#
# This is useful in different scenarios, especially in the case of multiple
# data center operations, where we want one side to never be promoted if not
# in the case of a total DC failure.
#
# cluster-replica-no-failover no

# This option, when set to yes, allows nodes to serve read traffic while the
# the cluster is in a down state, as long as it believes it owns the slots.
#
# This is useful for two cases.  The first case is for when an application
# doesn't require consistency of data during node failures or network partitions.
# One example of this is a cache, where as long as the node has the data it
# should be able to serve it.
#
# The second use case is for configurations that don't meet the recommended
# three shards but want to enable cluster mode and scale later. A
# master outage in a 1 or 2 shard configuration causes a read/write outage to the
# entire cluster without this option set, with it set there is only a write outage.
# Without a quorum of masters, slot ownership will not change automatically.
#
# cluster-allow-reads-when-down no

# In order to setup your cluster make sure to read the documentation
# available at http://redis.io web site.

########################## CLUSTER DOCKER/NAT support  ########################

# In certain deployments, Redis Cluster nodes address discovery fails, because
# addresses are NAT-ted or because ports are forwarded (the typical case is
# Docker and other containers).
#
# In order to make Redis Cluster working in such environments, a static
# configuration where each node knows its public address is needed. The
# following two options are used for this scope, and are:
#
# * cluster-announce-ip
# * cluster-announce-port
# * cluster-announce-bus-port
#
# Each instruct the node about its address, client port, and cluster message
# bus port. The information is then published in the header of the bus packets
# so that other nodes will be able to correctly map the address of the node
# publishing the information.
#
# If the above options are not used, the normal Redis Cluster auto-detection
# will be used instead.
#
# Note that when remapped, the bus port may not be at the fixed offset of
# clients port + 10000, so you can specify any port and bus-port depending
# on how they get remapped. If the bus-port is not set, a fixed offset of
# 10000 will be used as usually.
#
# Example:
#
# cluster-announce-ip 10.1.1.5
# cluster-announce-port 6379
# cluster-announce-bus-port 6380

################################## SLOW LOG ###################################

# The Redis Slow Log is a system to log queries that exceeded a specified
# execution time. The execution time does not include the I/O operations
# like talking with the client, sending the reply and so forth,
# but just the time needed to actually execute the command (this is the only
# stage of command execution where the thread is blocked and can not serve
# other requests in the meantime).
#
# You can configure the slow log with two parameters: one tells Redis
# what is the execution time, in microseconds, to exceed in order for the
# command to get logged, and the other parameter is the length of the
# slow log. When a new command is logged the oldest one is removed from the
# queue of logged commands.

# The following time is expressed in microseconds, so 1000000 is equivalent
# to one second. Note that a negative number disables the slow log, while
# a value of zero forces the logging of every command.
slowlog-log-slower-than 10000

# There is no limit to this length. Just be aware that it will consume memory.
# You can reclaim memory used by the slow log with SLOWLOG RESET.
slowlog-max-len 128

################################ LATENCY MONITOR ##############################

# The Redis latency monitoring subsystem samples different operations
# at runtime in order to collect data related to possible sources of
# latency of a Redis instance.
#
# Via the LATENCY command this information is available to the user that can
# print graphs and obtain reports.
#
# The system only logs operations that were performed in a time equal or
# greater than the amount of milliseconds specified via the
# latency-monitor-threshold configuration directive. When its value is set
# to zero, the latency monitor is turned off.
#
# By default latency monitoring is disabled since it is mostly not needed
# if you don't have latency issues, and collecting data has a performance
# impact, that while very small, can be measured under big load. Latency
# monitoring can easily be enabled at runtime using the command
# "CONFIG SET latency-monitor-threshold <milliseconds>" if needed.
latency-monitor-threshold 0

############################# EVENT NOTIFICATION ##############################

# Redis can notify Pub/Sub clients about events happening in the key space.
# This feature is documented at http://redis.io/topics/notifications
#
# For instance if keyspace events notification is enabled, and a client
# performs a DEL operation on key "foo" stored in the Database 0, two
# messages will be published via Pub/Sub:
#
# PUBLISH __keyspace@0__:foo del
# PUBLISH __keyevent@0__:del foo
#
# It is possible to select the events that Redis will notify among a set
# of classes. Every class is identified by a single character:
#
#  K     Keyspace events, published with __keyspace@<db>__ prefix.
#  E     Keyevent events, published with __keyevent@<db>__ prefix.
#  g     Generic commands (non-type specific) like DEL, EXPIRE, RENAME, ...
#  $     String commands
#  l     List commands
#  s     Set commands
#  h     Hash commands
#  z     Sorted set commands
#  x     Expired events (events generated every time a key expires)
#  e     Evicted events (events generated when a key is evicted for maxmemory)
#  t     Stream commands
#  m     Key-miss events (Note: It is not included in the 'A' class)
#  A     Alias for g$lshzxet, so that the "AKE" string means all the events
#        (Except key-miss events which are excluded from 'A' due to their
#         unique nature).
#
#  The "notify-keyspace-events" takes as argument a string that is composed
#  of zero or multiple characters. The empty string means that notifications
#  are disabled.
#
#  Example: to enable list and generic events, from the point of view of the
#           event name, use:
#
#  notify-keyspace-events Elg
#
#  Example 2: to get the stream of the expired keys subscribing to channel
#             name __keyevent@0__:expired use:
#
#  notify-keyspace-events Ex
#
#  By default all notifications are disabled because most users don't need
#  this feature and the feature has some overhead. Note that if you don't
#  specify at least one of K or E, no events will be delivered.
notify-keyspace-events ""

############################### GOPHER SERVER #################################

# Redis contains an implementation of the Gopher protocol, as specified in
# the RFC 1436 (https://www.ietf.org/rfc/rfc1436.txt).
#
# The Gopher protocol was very popular in the late '90s. It is an alternative
# to the web, and the implementation both server and client side is so simple
# that the Redis server has just 100 lines of code in order to implement this
# support.
#
# What do you do with Gopher nowadays? Well Gopher never *really* died, and
# lately there is a movement in order for the Gopher more hierarchical content
# composed of just plain text documents to be resurrected. Some want a simpler
# internet, others believe that the mainstream internet became too much
# controlled, and it's cool to create an alternative space for people that
# want a bit of fresh air.
#
# Anyway for the 10nth birthday of the Redis, we gave it the Gopher protocol
# as a gift.
#
# --- HOW IT WORKS? ---
#
# The Redis Gopher support uses the inline protocol of Redis, and specifically
# two kind of inline requests that were anyway illegal: an empty request
# or any request that starts with "/" (there are no Redis commands starting
# with such a slash). Normal RESP2/RESP3 requests are completely out of the
# path of the Gopher protocol implementation and are served as usually as well.
#
# If you open a connection to Redis when Gopher is enabled and send it
# a string like "/foo", if there is a key named "/foo" it is served via the
# Gopher protocol.
#
# In order to create a real Gopher "hole" (the name of a Gopher site in Gopher
# talking), you likely need a script like the following:
#
#   https://github.com/antirez/gopher2redis
#
# --- SECURITY WARNING ---
#
# If you plan to put Redis on the internet in a publicly accessible address
# to server Gopher pages MAKE SURE TO SET A PASSWORD to the instance.
# Once a password is set:
#
#   1. The Gopher server (when enabled, not by default) will still serve
#      content via Gopher.
#   2. However other commands cannot be called before the client will
#      authenticate.
#
# So use the 'requirepass' option to protect your instance.
#
# To enable Gopher support uncomment the following line and set
# the option from no (the default) to yes.
#
# gopher-enabled no

############################### ADVANCED CONFIG ###############################

# Hashes are encoded using a memory efficient data structure when they have a
# small number of entries, and the biggest entry does not exceed a given
# threshold. These thresholds can be configured using the following directives.
hash-max-ziplist-entries 512
hash-max-ziplist-value 64

# Lists are also encoded in a special way to save a lot of space.
# The number of entries allowed per internal list node can be specified
# as a fixed maximum size or a maximum number of elements.
# For a fixed maximum size, use -5 through -1, meaning:
# -5: max size: 64 Kb  <-- not recommended for normal workloads
# -4: max size: 32 Kb  <-- not recommended
# -3: max size: 16 Kb  <-- probably not recommended
# -2: max size: 8 Kb   <-- good
# -1: max size: 4 Kb   <-- good
# Positive numbers mean store up to _exactly_ that number of elements
# per list node.
# The highest performing option is usually -2 (8 Kb size) or -1 (4 Kb size),
# but if your use case is unique, adjust the settings as necessary.
list-max-ziplist-size -2

# Lists may also be compressed.
# Compress depth is the number of quicklist ziplist nodes from *each* side of
# the list to *exclude* from compression.  The head and tail of the list
# are always uncompressed for fast push/pop operations.  Settings are:
# 0: disable all list compression
# 1: depth 1 means "don't start compressing until after 1 node into the list,
#    going from either the head or tail"
#    So: [head]->node->node->...->node->[tail]
#    [head], [tail] will always be uncompressed; inner nodes will compress.
# 2: [head]->[next]->node->node->...->node->[prev]->[tail]
#    2 here means: don't compress head or head->next or tail->prev or tail,
#    but compress all nodes between them.
# 3: [head]->[next]->[next]->node->node->...->node->[prev]->[prev]->[tail]
# etc.
list-compress-depth 0

# Sets have a special encoding in just one case: when a set is composed
# of just strings that happen to be integers in radix 10 in the range
# of 64 bit signed integers.
# The following configuration setting sets the limit in the size of the
# set in order to use this special memory saving encoding.
set-max-intset-entries 512

# Similarly to hashes and lists, sorted sets are also specially encoded in
# order to save a lot of space. This encoding is only used when the length and
# elements of a sorted set are below the following limits:
zset-max-ziplist-entries 128
zset-max-ziplist-value 64

# HyperLogLog sparse representation bytes limit. The limit includes the
# 16 bytes header. When an HyperLogLog using the sparse representation crosses
# this limit, it is converted into the dense representation.
#
# A value greater than 16000 is totally useless, since at that point the
# dense representation is more memory efficient.
#
# The suggested value is ~ 3000 in order to have the benefits of
# the space efficient encoding without slowing down too much PFADD,
# which is O(N) with the sparse encoding. The value can be raised to
# ~ 10000 when CPU is not a concern, but space is, and the data set is
# composed of many HyperLogLogs with cardinality in the 0 - 15000 range.
hll-sparse-max-bytes 3000

# Streams macro node max size / items. The stream data structure is a radix
# tree of big nodes that encode multiple items inside. Using this configuration
# it is possible to configure how big a single node can be in bytes, and the
# maximum number of items it may contain before switching to a new node when
# appending new stream entries. If any of the following settings are set to
# zero, the limit is ignored, so for instance it is possible to set just a
# max entires limit by setting max-bytes to 0 and max-entries to the desired
# value.
stream-node-max-bytes 4096
stream-node-max-entries 100

# Active rehashing uses 1 millisecond every 100 milliseconds of CPU time in
# order to help rehashing the main Redis hash table (the one mapping top-level
# keys to values). The hash table implementation Redis uses (see dict.c)
# performs a lazy rehashing: the more operation you run into a hash table
# that is rehashing, the more rehashing "steps" are performed, so if the
# server is idle the rehashing is never complete and some more memory is used
# by the hash table.
#
# The default is to use this millisecond 10 times every second in order to
# actively rehash the main dictionaries, freeing memory when possible.
#
# If unsure:
# use "activerehashing no" if you have hard latency requirements and it is
# not a good thing in your environment that Redis can reply from time to time
# to queries with 2 milliseconds delay.
#
# use "activerehashing yes" if you don't have such hard requirements but
# want to free memory asap when possible.
activerehashing yes

# The client output buffer limits can be used to force disconnection of clients
# that are not reading data from the server fast enough for some reason (a
# common reason is that a Pub/Sub client can't consume messages as fast as the
# publisher can produce them).
#
# The limit can be set differently for the three different classes of clients:
#
# normal -> normal clients including MONITOR clients
# replica  -> replica clients
# pubsub -> clients subscribed to at least one pubsub channel or pattern
#
# The syntax of every client-output-buffer-limit directive is the following:
#
# client-output-buffer-limit <class> <hard limit> <soft limit> <soft seconds>
#
# A client is immediately disconnected once the hard limit is reached, or if
# the soft limit is reached and remains reached for the specified number of
# seconds (continuously).
# So for instance if the hard limit is 32 megabytes and the soft limit is
# 16 megabytes / 10 seconds, the client will get disconnected immediately
# if the size of the output buffers reach 32 megabytes, but will also get
# disconnected if the client reaches 16 megabytes and continuously overcomes
# the limit for 10 seconds.
#
# By default normal clients are not limited because they don't receive data
# without asking (in a push way), but just after a request, so only
# asynchronous clients may create a scenario where data is requested faster
# than it can read.
#
# Instead there is a default limit for pubsub and replica clients, since
# subscribers and replicas receive data in a push fashion.
#
# Both the hard or the soft limit can be disabled by setting them to zero.
client-output-buffer-limit normal 0 0 0
client-output-buffer-limit replica 256mb 64mb 60
client-output-buffer-limit pubsub 32mb 8mb 60

# Client query buffers accumulate new commands. They are limited to a fixed
# amount by default in order to avoid that a protocol desynchronization (for
# instance due to a bug in the client) will lead to unbound memory usage in
# the query buffer. However you can configure it here if you have very special
# needs, such us huge multi/exec requests or alike.
#
# client-query-buffer-limit 1gb

# In the Redis protocol, bulk requests, that are, elements representing single
# strings, are normally limited ot 512 mb. However you can change this limit
# here, but must be 1mb or greater
#
# proto-max-bulk-len 512mb

# Redis calls an internal function to perform many background tasks, like
# closing connections of clients in timeout, purging expired keys that are
# never requested, and so forth.
#
# Not all tasks are performed with the same frequency, but Redis checks for
# tasks to perform according to the specified "hz" value.
#
# By default "hz" is set to 10. Raising the value will use more CPU when
# Redis is idle, but at the same time will make Redis more responsive when
# there are many keys expiring at the same time, and timeouts may be
# handled with more precision.
#
# The range is between 1 and 500, however a value over 100 is usually not
# a good idea. Most users should use the default of 10 and raise this up to
# 100 only in environments where very low latency is required.
hz 10

# Normally it is useful to have an HZ value which is proportional to the
# number of clients connected. This is useful in order, for instance, to
# avoid too many clients are processed for each background task invocation
# in order to avoid latency spikes.
#
# Since the default HZ value by default is conservatively set to 10, Redis
# offers, and enables by default, the ability to use an adaptive HZ value
# which will temporary raise when there are many connected clients.
#
# When dynamic HZ is enabled, the actual configured HZ will be used
# as a baseline, but multiples of the configured HZ value will be actually
# used as needed once more clients are connected. In this way an idle
# instance will use very little CPU time while a busy instance will be
# more responsive.
dynamic-hz yes

# When a child rewrites the AOF file, if the following option is enabled
# the file will be fsync-ed every 32 MB of data generated. This is useful
# in order to commit the file to the disk more incrementally and avoid
# big latency spikes.
aof-rewrite-incremental-fsync yes

# When redis saves RDB file, if the following option is enabled
# the file will be fsync-ed every 32 MB of data generated. This is useful
# in order to commit the file to the disk more incrementally and avoid
# big latency spikes.
rdb-save-incremental-fsync yes

# Redis LFU eviction (see maxmemory setting) can be tuned. However it is a good
# idea to start with the default settings and only change them after investigating
# how to improve the performances and how the keys LFU change over time, which
# is possible to inspect via the OBJECT FREQ command.
#
# There are two tunable parameters in the Redis LFU implementation: the
# counter logarithm factor and the counter decay time. It is important to
# understand what the two parameters mean before changing them.
#
# The LFU counter is just 8 bits per key, it's maximum value is 255, so Redis
# uses a probabilistic increment with logarithmic behavior. Given the value
# of the old counter, when a key is accessed, the counter is incremented in
# this way:
#
# 1. A random number R between 0 and 1 is extracted.
# 2. A probability P is calculated as 1/(old_value*lfu_log_factor+1).
# 3. The counter is incremented only if R < P.
#
# The default lfu-log-factor is 10. This is a table of how the frequency
# counter changes with a different number of accesses with different
# logarithmic factors:
#
# +--------+------------+------------+------------+------------+------------+
# | factor | 100 hits   | 1000 hits  | 100K hits  | 1M hits    | 10M hits   |
# +--------+------------+------------+------------+------------+------------+
# | 0      | 104        | 255        | 255        | 255        | 255        |
# +--------+------------+------------+------------+------------+------------+
# | 1      | 18         | 49         | 255        | 255        | 255        |
# +--------+------------+------------+------------+------------+------------+
# | 10     | 10         | 18         | 142        | 255        | 255        |
# +--------+------------+------------+------------+------------+------------+
# | 100    | 8          | 11         | 49         | 143        | 255        |
# +--------+------------+------------+------------+------------+------------+
#
# NOTE: The above table was obtained by running the following commands:
#
#   redis-benchmark -n 1000000 incr foo
#   redis-cli object freq foo
#
# NOTE 2: The counter initial value is 5 in order to give new objects a chance
# to accumulate hits.
#
# The counter decay time is the time, in minutes, that must elapse in order
# for the key counter to be divided by two (or decremented if it has a value
# less <= 10).
#
# The default value for the lfu-decay-time is 1. A Special value of 0 means to
# decay the counter every time it happens to be scanned.
#
# lfu-log-factor 10
# lfu-decay-time 1

########################### ACTIVE DEFRAGMENTATION #######################
#
# What is active defragmentation?
# -------------------------------
#
# Active (online) defragmentation allows a Redis server to compact the
# spaces left between small allocations and deallocations of data in memory,
# thus allowing to reclaim back memory.
#
# Fragmentation is a natural process that happens with every allocator (but
# less so with Jemalloc, fortunately) and certain workloads. Normally a server
# restart is needed in order to lower the fragmentation, or at least to flush
# away all the data and create it again. However thanks to this feature
# implemented by Oran Agra for Redis 4.0 this process can happen at runtime
# in an "hot" way, while the server is running.
#
# Basically when the fragmentation is over a certain level (see the
# configuration options below) Redis will start to create new copies of the
# values in contiguous memory regions by exploiting certain specific Jemalloc
# features (in order to understand if an allocation is causing fragmentation
# and to allocate it in a better place), and at the same time, will release the
# old copies of the data. This process, repeated incrementally for all the keys
# will cause the fragmentation to drop back to normal values.
#
# Important things to understand:
#
# 1. This feature is disabled by default, and only works if you compiled Redis
#    to use the copy of Jemalloc we ship with the source code of Redis.
#    This is the default with Linux builds.
#
# 2. You never need to enable this feature if you don't have fragmentation
#    issues.
#
# 3. Once you experience fragmentation, you can enable this feature when
#    needed with the command "CONFIG SET activedefrag yes".
#
# The configuration parameters are able to fine tune the behavior of the
# defragmentation process. If you are not sure about what they mean it is
# a good idea to leave the defaults untouched.

# Enabled active defragmentation
# activedefrag no

# Minimum amount of fragmentation waste to start active defrag
# active-defrag-ignore-bytes 100mb

# Minimum percentage of fragmentation to start active defrag
# active-defrag-threshold-lower 10

# Maximum percentage of fragmentation at which we use maximum effort
# active-defrag-threshold-upper 100

# Minimal effort for defrag in CPU percentage, to be used when the lower
# threshold is reached
# active-defrag-cycle-min 1

# Maximal effort for defrag in CPU percentage, to be used when the upper
# threshold is reached
# active-defrag-cycle-max 25

# Maximum number of set/hash/zset/list fields that will be processed from
# the main dictionary scan
# active-defrag-max-scan-fields 1000

# Jemalloc background thread for purging will be enabled by default
jemalloc-bg-thread yes

# It is possible to pin different threads and processes of Redis to specific
# CPUs in your system, in order to maximize the performances of the server.
# This is useful both in order to pin different Redis threads in different
# CPUs, but also in order to make sure that multiple Redis instances running
# in the same host will be pinned to different CPUs.
#
# Normally you can do this using the "taskset" command, however it is also
# possible to this via Redis configuration directly, both in Linux and FreeBSD.
#
# You can pin the server/IO threads, bio threads, aof rewrite child process, and
# the bgsave child process. The syntax to specify the cpu list is the same as
# the taskset command:
#
# Set redis server/io threads to cpu affinity 0,2,4,6:
# server_cpulist 0-7:2
#
# Set bio threads to cpu affinity 1,3:
# bio_cpulist 1,3
#
# Set aof rewrite child process to cpu affinity 8,9,10,11:
# aof_rewrite_cpulist 8-11
#
# Set bgsave child process to cpu affinity 1,10,11
# bgsave_cpulist 1,10-11
|


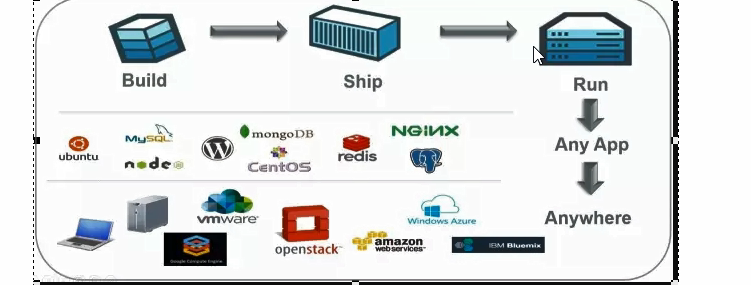


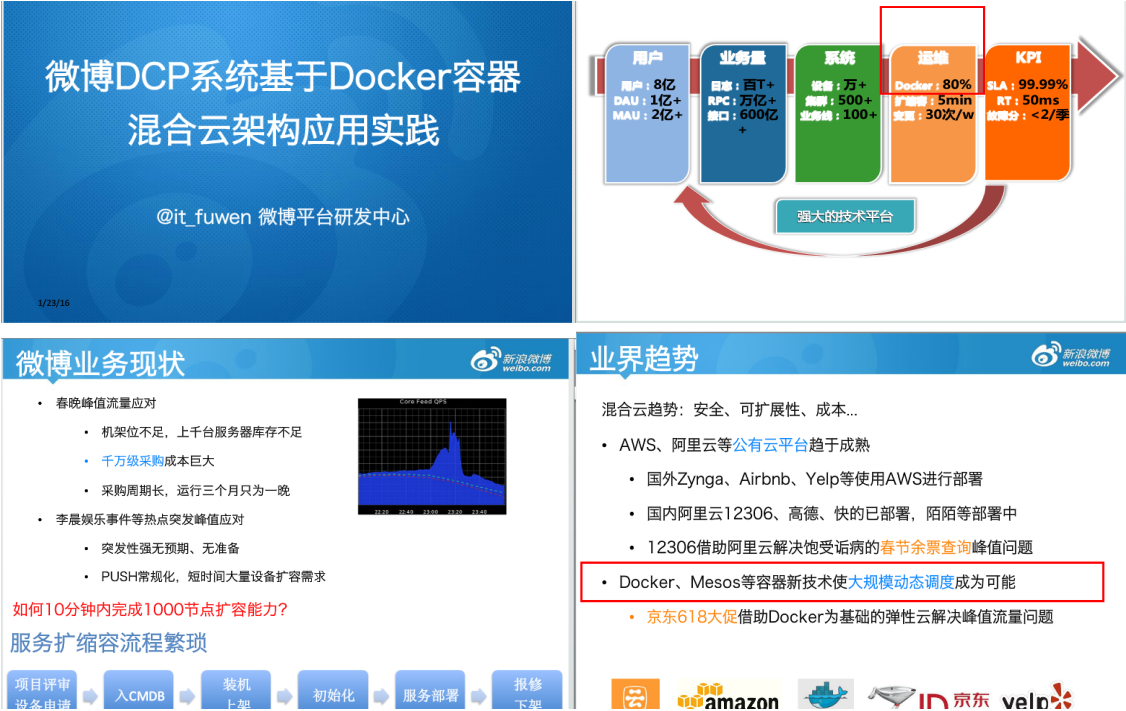
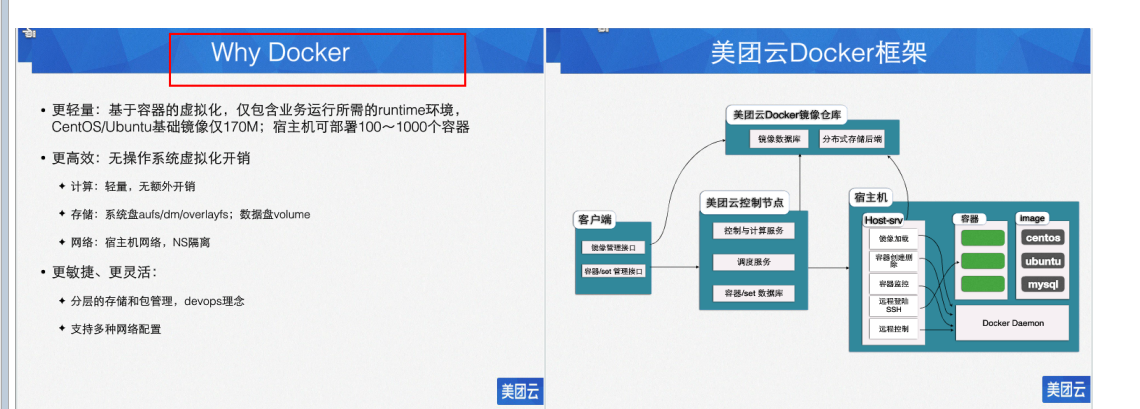


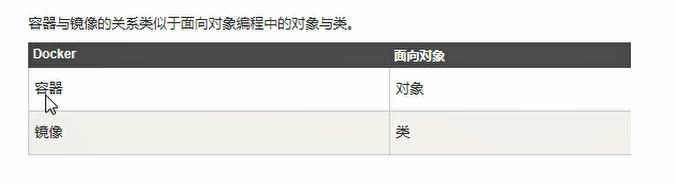
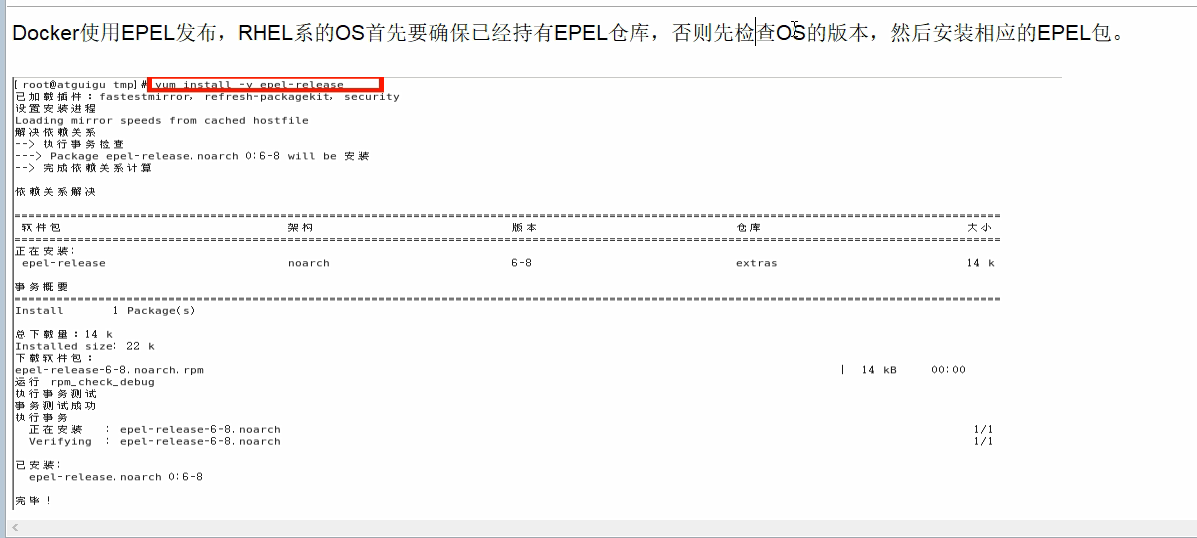

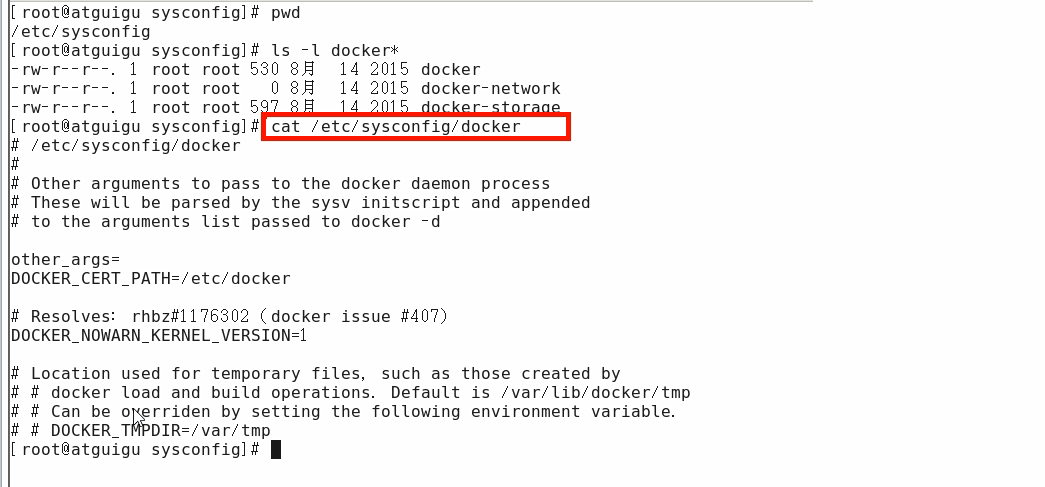
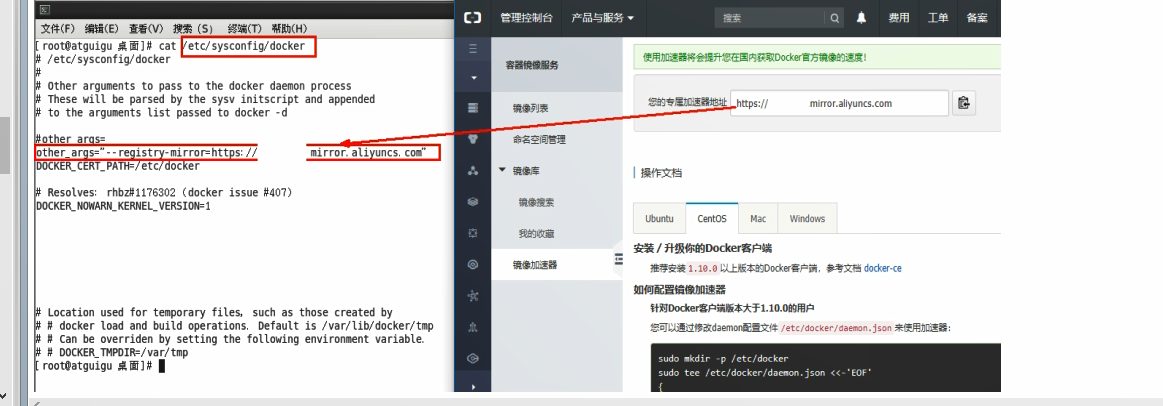
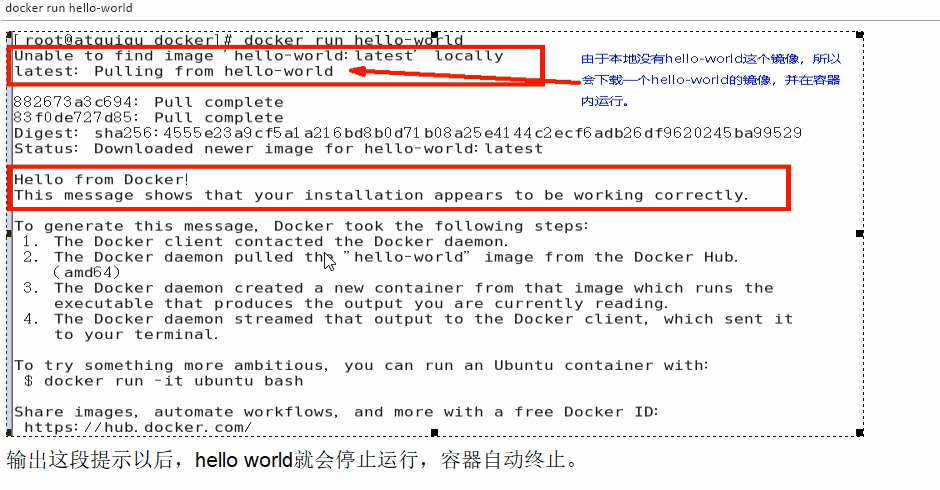

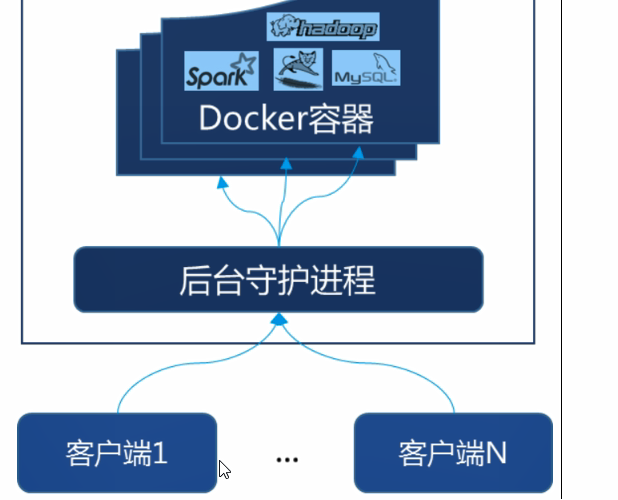

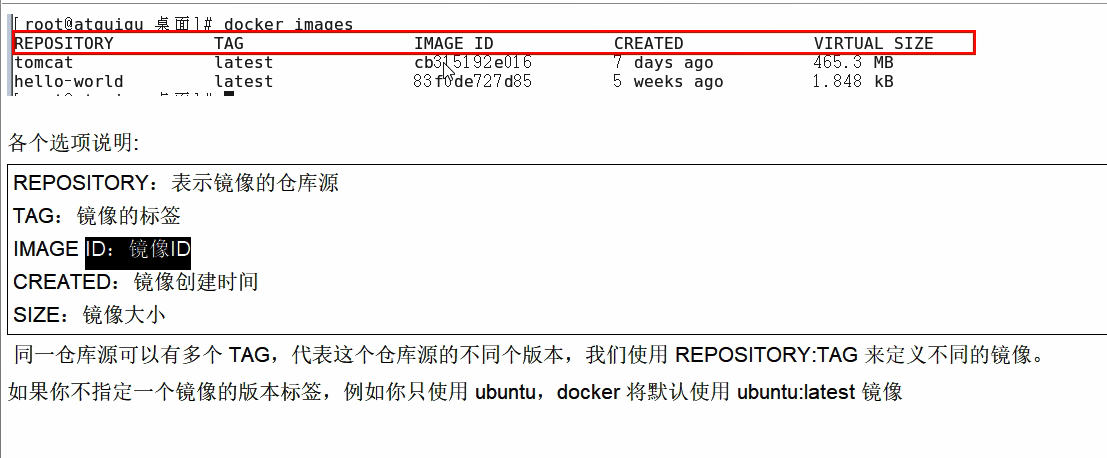 OPTIONS 说明: